At Aitape to Wewak, northern New Guinea 1944-45
Previous -
Index -
Next
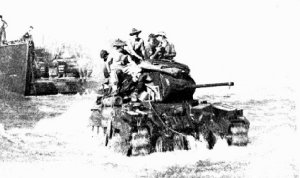
On the 22 April 1944 the US XI Corps forces amphibiously landed and formed a bridgehead in the rear of the Japanese frontline position on the north coast of New Guinea at Aitape. In conjunction with this operation forced landings were carried out on the main Japanese air base at Hollandia, occupied Netherlands East Indies (NEI), to secure and hold an airfield and establish light naval facilities for further operations against the enemy. Maj-General Stevens AIF 6 Division took over from the Americans, as they moved north by November, the role of airfield and harbour defence at Aitape then began active patrolling. The monsoonal rains had started with the creeks and rivers rising rapidly, making bridge building, and repair, a hazardous profession. By January 1945 ‘C squadron of the 2/4 Armoured Regiment (AR) had moved up by coastal vessels to the Aitape area and was in reserve at Rocky Point 2/11Btn’s HQ position. This armoured unit, the 2/4AR, was formed to relieve the 2/6AR at Buna but was re-armed with 2pdr gun infantry tank Matilda II’s and expanded into a self-contained regimental group. The country here was not suited to tanks but they proved useful for clearing small groups of Japanese snipers from the escarpment overlooking the beach.
Being eventually attached to various sized infantry formations to operate within accurate artillery range, with their own maintenance and supply services. Fought as self-supporting squadron groups, isolated from the intermittent supply line that were frequently cut by the enemy and the hazards of the jungle. The 16 Brigade Group (BG) under Brig King began leapfrogging down the coast, with 19BG in divisional reserve, battling the Japanese 237 Regiment and other elements of the 20 Division under Maj-General Kikutaro in General Adachi’s XVIII Army Area. The 17BG, with stealthy commando cavalry regiments ranging forward, headed inland across the steep ravines and razorback spurs of the Terricelli Mountain Range to take the initiative to the Japanese. The 2/11Btn captured Cape Djueran on the 6 January 1945 and supported by accurate covering fire from artillery, and the Matilda tanks of ‘C Squadron, had pushed the attack on the strongly defended enemy positions. The 19BG in its attack through to Niap was held up by a resolute Japanese pocket and later in the morning three tanks and a bulldozer were sent forward along the beach whence the bulldozer cut a track to the Old German Road. The Matildas trekked along the fresh cut alley-way with the infantry and by mid-afternoon Lieut Dewar’s platoon were entering Niap on the western extremity of Dogreto Bay. The next day the Japanese withdrew to another defensive position down the coast and the Australians followed along the open beach shoreline.
The 2/3Btn pincer movement advancing with two companies forward, one astride the road the other along the foothills encountered the enemy dug in defending a road block. The Matildas went in frontally while an infantry platoon for the flank and the enemy was driven out of Boiken Plantation. In a similar fight at Cholial the Japanese fled leaving 3 dead, a broken 37mm gun and the withdrawal of the enemy continued. A thousand Japanese soldiers had been killed through direct combat or aggressive patrols by now, while a large number had wandered off into the jungle to die from malnutrition, sickness, festered wounds, starvation and tropical diseases. Anyway the main pocket of Japanese resistance moved in an easterly direction and villages were ransacked of food, the natives coming to the Australians for protection, but small enemy parties were still to be found in almost every village. On the 27 April the infantry crossed the Hawain River where the 2/4Btn passed through the 2/1Btn and this brought the advance by Matildas to within a thick 12miles from the main objective of Wewak. On the 3 May the 2/4Btn, with three troops of tanks in assistance, advanced from the Hawain River and covered six miles without meeting enemy resistance. Brig Martin’s 19BG pushed on to Cape Wom, fell 4 May, and with the additional troops from the 16BG, the covert 2/7 Commando Squadron, detachments from 2/4AR and all the divisional artillery would attacked Wewak Point. Meanwhile the 17BG foot slogging up and grunting down in the Terricelli highlands, supplied by C-47 biscuit bombers and even had two 4.2inch mortars parachuted in, were relentlessly pushing the Japanese dissipated 41 Division both east and south away from the coast and their supplies. From the village of Tong across the Danmap River through the precipitous jungle, down the Nanu River to Samisai east across the Amuk River to Amam, south to Balaga and across another raging river the Ninah to the Maprik area and even further to the east to the air-landing strips beyond at Hayfield, Yamil, and finally by July the 17BG arrived at Kiariva twenty miles south-west of Wewak, as the crow fly’s.
On the 14 May in the lead up attacks for advantage positions the 2/4Btn, supported by tanks assaulted Wirui Mission from the east and after a short sharp fight expelled the enemy from all but the northwestern spur. The next day a platoon, sending two sections forward, set upon the remaining Japanese posts and after several Australian soldiers had been hit the Diggers became pinned by irratic aimed machine-gun bullets. In the infantry support section Private Edward Kennedy was unable to bring his Australian-made light machine-gun to bear on the enemy bunker because of the nature and lay of the ground. On his own initiative, and without orders, immediately amongst the kunai grass stood up in full view of the fallible Japanese and engaged the target with full fire of the Bren machine-guns 30round banana clip. Then Private Rua handed over his rifle, yet the enemy machine-gunner was only some fifty metres away firing the projectiles, passing between his arms & legs, through his loose hung jungle uniform and past his body, yet miraculously none hit him. Then the loaded Bren-gun again, and he silenced another post with that weapon. With this second Japanese location neutralised the attack was successfully concluded by an arriving Matilda knocking out the remaining posts, linking the pair of daring Digger’s 2/4Btn with the 2/11Btn and for his coolness and bravery Kenna was awarded the Victoria Cross. The Australian sappers under small arms and miscellaneous enemy gunfire from mixed units of the 51 Division sited on Wewak Point carried on with erecting a temporary bridge for the tanks to get across a creek so as to arrive at the attack assembly area. Maj Cory, commanding the tanks at Wewak requested H-hour be delayed to 6.10am, to allow for more daylight to appear during the tropical rainstorm.
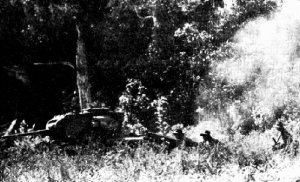
So at 5.55am the divisional artillery opened up and Capt Hawke’s company advanced with two Matildas, they came under small arms fire with a few interspersed artillery shells and took the knoll of Wewak Point. Capt Atkinson’s company on the left moved off ten minutes later with Lieut Hall’s tank troop, came under heavy fire from the Japanese die-hards in the caves on the hundred-foot escarpment and was halted. Under a barrage by artillery the infantry moved in with latest flame-throwing Matilda "frogging" active snipers, cave entrances and concealed foxholes and by 8am, after an early amphibious outflanking move from the sea, the fanatical Japanese garrison’s resistance had been broken on Wewak point. The troops of the 2/24Btn whom had carried out the final assault were proud when they hoisted the Union Jack on a shell scarred observation tower. Next was the hurry up and wait preparations around the captured airstrips and the light port facilities of Wewak and for the remainder of the campaign the Australians under command of Maj-Gen Robertson drove the weary Japanese up into the green covered mountains sending hit & run reconnaissance patrols against the elaborate last stand positions inland. During early August news of the expected Imperial Japanese acceptance of the surrender terms formulated at Potsdam resulted in operations designed to avoid as much as possible loss of valued Australian lives, yet the end of the war was declared and surrender negotiations arranged. It was apparent throughout this coastal campaign that the indoctrinated Japanese military here had no stomach nor effective weapon for the thick-skinned Matilda Infantry tanks, as there was ample evidence they had speedily pulled out of hastily prepared defensive sites as the mechanical monstrosity drew near. The AIF 6 Division had simultaneously tackled the difficult jungle, amphibiously traversed the coastline and conducted mountain warfare with skill, economy, effectively eliminating the large malaria-ridden Japanese occupying garrison adding to their laurels of desert battles in North Africa.
Previous -
Index -
Next
|